Women's Fashion

Traditional

Historical

Recent Posts

Princess Cut Blouse Design in Raglan Style

7/17/2016 1 Comment

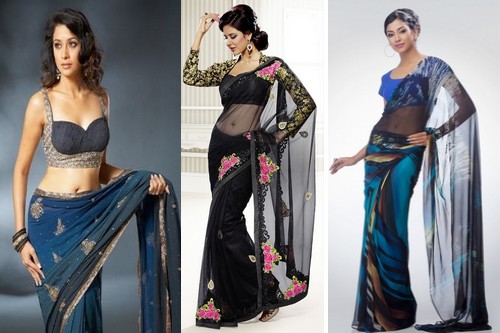
Since the princess cut blouse and the raglan style sari blouse are quite a rage these days, we picked the same for the tutorial. No matter even if your sari is mundane with less to no works on it, a great blouse design can instantly add glamor to your look, giving a luxury feel to your sari. Most Bollywood celebrity blouses also have princess cut blouse designs that go very well with sheer or net sarees that are see-through. These princess cut blouse designs can come in an array of designs and patterns. But let’s start with a basic princess cut blouse design tutorial.
For those who have hands on experience with their sewing machine, here is an elaborate drafting instruction on blouse cutting with step by step guide to make a princess cut blouse.
While making blouse designs, cutting is the most important thing. This not only gives a shape, but the fit and style also depends on the blouse cutting and patterns too.
Princess cut blouse design Measurements
Length = 14 ½”
Chest = 36”
Shoulder = 14”
Waist = 30”
Sleeve length = 9”
Round Arm = 13”
Constructions 
025-blouse-design-construction
For the princess cut blouse back design:
    (1-13)   = ¼ waist + ½”
    (13-14) = 1 ½” or (1-2)
    (14-15) = ½”
    (16)      = centre of (8-6)
    (17)      = centre of (14-2)
    (17-18) = ½”
    (6-A),(13-B) & (15-C) = 1 ½”(for seam)
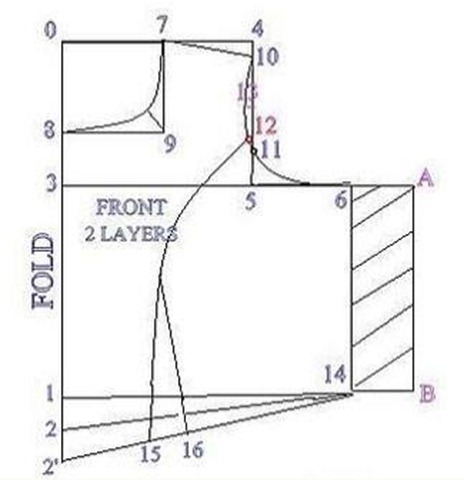
If u want sleeve less pattern in a princess cut blouse design:  then, (0-3) = 1/6 chest
026-pattern-in-a-princess-cut-blouse
For the front profile of a princess cut blouse design:
    (0-1) = Length + ½”
    (1-2) = 1 ½”
    (2-2′) = 1 1/2″ (in turn 1” and ½ “ for seam)
    (0-3) = 1/6 chest + 1 ½”
    (0-4) = ½ shoulder + ½”
    (4-5) = straight line
    (3-6) = ¼ chest + ¾” (for tight fitting – 1/4 ch+1/4″ (or) 1/2″
    (7-4) = 4” or 1/12 chest + 1”
    (4-10) = ½” down
    (8-3) = 1”
    (7-9-8) = front neck curve
    (11-5) = 1”
    (13) = ½”
    (1-14) = ¼ waist + ½”
    (2-15) = 1/12 chest + 1”
    (15-16) = 3/4”
    ( 12 ) = centre of (10-6)
    (6-A) & (14-B) = 1 ½” for seam
0027-princess-cut-blouse
For sleeveless pattern take this measurement:   (0-3) = 1/6 chest
For sleeves:
    (0-1) = length + ½”
    (1-2) = 1 ½”
    (0-3) = 1/12 chest + 1”
    (3-4) = 1/6 chest + ¾ “
    (1-5) = ½ Round Arm
    (6-7) = ½”
    (8) = centre of (0-4)
    (8-9) = ¾”
    (10) = centre of (8-4)
    (10-11) = ¾”
    (4-a), (5-b) & (7-c) = 1 ½” (for seam)
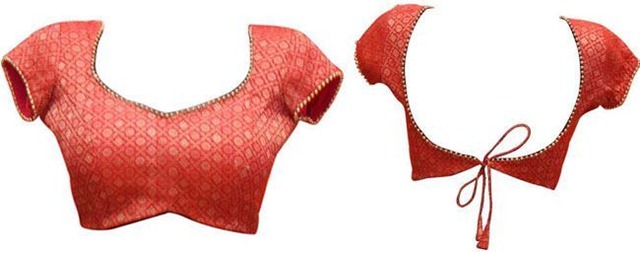
028-sleeveless-pattern
How to cut this blouse when the back draft 3 & 6, 1 & 13 measurements are not same if we calculate and draw?
From 6 to 13 is a slanting line. (3-6)= 1/4 chest + 3/4″
(1-13) = (3-6) minus 1/2″ (or) take waist round then, calculate 1/4 waist + 1/2″
029-Shriya-saran-blue-transparent-saree
Princess Line Directed From Neckline
  • Go for darted sari blouse patterns: If you’ve selected raglan style for making princess line blouse then your first requirement is to go for darted sari blouse patterns
  • Create back & front patterns: For this you’ll have to make paper patterns of both back and front bodices for a darted raglan style sari blouse
  • Create seam: This pattern will also feature seam allowances. First cut off all the dart lines and then cut the waistline darts towards necklines
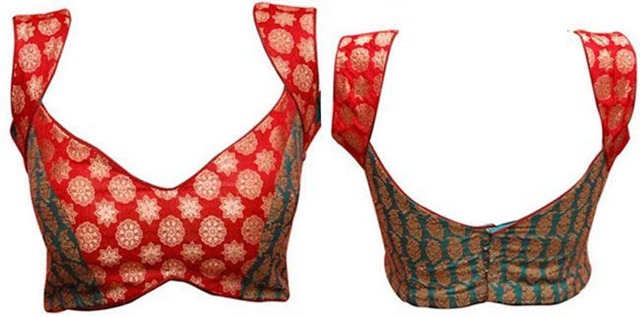
030-Neckline
Back Bodice Pattern for Princess Line
  • Create two parts: Back bodice is quite easy to obtain. All you need is to just cut off the extra dart allowance and separate the two parts
  • Create the princess line: Now take the impressions on another pattern paper while adding seam allowance at the dart line so as to create the princess line
  • Shape the neckline: Now mark the notches for joining and grains for cutting
  • Take the front bodice pattern: For this you’ll have to stick all the darts except the waist line dart
  • Create dart manipulation: The pattern you’ve create will now result in a 3-dimensional structure. This process of transferring darts from one place to the other is technically known as dart manipulation
  • Trace the outlines: Now after getting the 3D structure, press the pattern over a pattern paper and traced the outlines
  • Obtain the princess line: Since the darts are now manipulated into a seam line, you’ll now obtain your princess line
  • Shape the neckline: Add seam allowance to the freshly cut princess seam and shape the neckline
  • Pattern cutting: Mark the notches for joining and grain lines for pattern cutting
  • Get the final font patterns: For this, you’ll have to cut the patterns. And your final front patterns for princess seam blouse are ready
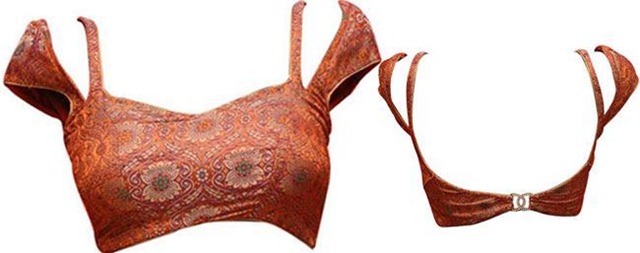
031-Princess-Line

Please comment your suggestions,
Note; all images from pinterest.com

Support Video 


Top 10 Must-Know Hand Embroidery Stitches

Top 10 Must-Know Hand Embroidery Stitches

7/11/2016 Add Comment

If you have ever browsed through an embroidery book, especially the vintage variety, it can be a little overwhelming when trying to make sense of the different types of stitches the patterns might require. Some of the stitches may seem too challenging or perhaps laborious, but fear not, hand embroidery stitches are fun, and with practice, can become quite easy.

Let's discover the 10 best hand embroidery stitches

Once you familiarize yourself with basic stitches, you will find that they are the foundation to those more elaborate stitches that once seemed too difficult to tackle. Here are ten embroidery stitches to know as you move forward with hand embroidery.

1. Running stitch

The running stitch is good for outlining an embroidery design and is a very quick stitch to do. There are two ways to do the running stitch: the first method is similar to hand sewing and can be completed by pushing the needle and floss in and over the fabric in one continuous motion; the second method can be literally pushing the needle through the fabric and pulling it back up. I have heard this called the “punch and poke” or “stabbing” method.

2.Backstitch

Unlike the running stitch, the backstitch creates a solid line and is good for hand embroidering text or outlining a design. Begin by pulling the needle and floss up through the fabric and do one stitch forward. From underneath, space the needle out the length of your desired stitch, pull up through the fabric, and bring the needle and floss back down through the end of the previous stitch.

3. Split stitch

Similar to the backstitch, the split stitch creates a solid line with an added texture to it. This stitch is appropriate for text and outline as well, but it also works to fill designs and create variation from the running or backstitch. To begin, pull your needle and floss up through the fabric and create one straight stitch. Your needle and floss should be on the underside of your hoop. Bring the needle up through the center of the stitch you just created and stitch forward the same length as your initial stitch. Repeat by bringing the needle up through the center of each stitch.

4. Stem stitch

The stem stitch got its name from being the common stitch used for the stems of flowers or vines. I like to use this stitch for text because it can curve nicely with letters. Similar to the split stitch, you create one straight stitch forward and bring the needle and floss up underneath the fabric, but instead of going through the center of this initial stitch, you will bring the needle up just to the side of the stitch.

5. Satin stitch

A good filler stitch, the satin stitch creates a smooth appearance. I like to use this stitch to fill in hearts or the leaves of flowers. Take your needle and floss and create one stitch. Bring the needle up again just next to the opposite side of the initial stitch. Keep the stitches close to one another, as required to fill the pattern or design you are working with. 

6. French knots

This is a favorite decorative stitch for almost everyone that I know. French Knots can be used to accent designs or create fun fillers for most designs. You’ll have to use two hands to create the French Knot by bringing the needle and floss up through the fabric and wrapping the floss around the needle twice. Hold the end of the floss taut and bring the needle down just next to the space where it came out through. Keep holding the floss taut as you pull the needle through. You can vary the size of your French knots by wrapping the floss around the needle anywhere between one and three times.

7. Chain stitch

I used to think I would never learn to do this stitch, then I tried it, and now I love using the chain stitch. It makes for a great outline stitch as well as a frame for a pattern or design. Take your needle and floss and create a stitch, but before you pull the floss all the way through the fabric, allow it to form a loop. Bring the needle up through that loop in order to tether it from being pulled all the way through the fabric and pull. Place the needle either directly in the hole you just stitched, or close to it, and pull through creating another loop by not pulling the floss completely through the fabric. Pull the needle up through the loop to tether it and pull. Repeat the steps to continue the chain. When you reach the end of the chain, simply create a small stitch over the loop.

8. Lazy daisy

This is a version of the chain stitch often referred to as the "detached chain stitch" or "lazy daisy." Instead of continuing the chain, there is a small stitch made just over the end of the loop to create what looks like a daisy petal. Just like the chain stitch, take your needle and floss and create a stitch, but before you pull the floss all the way through the fabric, allow it to form a loop. Bring the needle up through that loop in order to tether it from being pulled all the way through the fabric and create a small stitch over the top of the loop. Space out the next loop or use the stitch to create a daisy. 

9. Feather stitch

Another variation of a chain stitch is the feather stitch. This stitch looks great as a frame or border to an embroidered piece. Similar to the chain stitch, you will use the second stitch to anchor the loop of the previous stitch, but this stitch covers more space. Bring the needle and floss up through the fabric and create a straight stitch, but don’t pull the floss all the way through. Allow a loop to form and bring the needle up through that loop. Space the next stitch over in the opposite direction from the previous stitch. Create another loop by not allowing the floss to go completely through the fabric. Pull the needle up through the loop and repeat on the opposite side.

10. Seed stitch

This is a good filler stitch. Depending how close or far you space out your seed stitch, you can create a wide fill or layers of floss that appear to have dimension. Imagine tossing the contents of a seed packet into the air and watching the seeds fall randomly on the ground. That same concept applies here. Bring the needle and floss up through the fabric and create a straight stitch. Bring the needle and floss up through the fabric again in a different angle. Continue until you have a filled area.

These stitches in no way comprise the totality of gorgeous hand embroidery stitches that exist, but they are exactly what you need to get you started. If you are already a seasoned embroiderer, maybe these will remind you to revisit those old tried and true stitches you may not have used in a while. I had forgotten how much the chain stitch used to intimidate me, but now, I'm so glad I tried it because it really is a fun stitch.

Source :- http://www.craftsy.com/blog/2014/04/hand-embroidery-stitches/

Article By :-  Kristen Valencia

Top 10 Fashion Trends for Women in 2016

Top 10 Fashion Trends for Women in 2016

6/26/2016 Add Comment

Fashion today is not meant for just celebrities and runway models. Media has exposed common people to the world of fashion. They have exposed people to the ever-changing fashion trends, getting updated in every season. Women from every walk of emulate the designs by top-notch designers. We have picked  the Top 10 Fashion Trends for Women to Adopt in 2016.

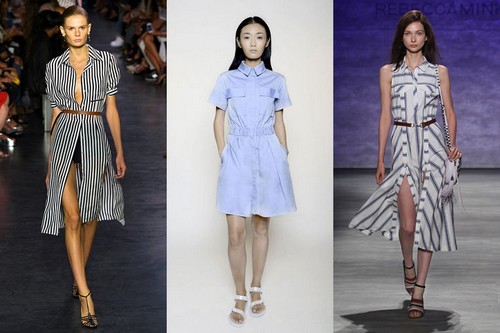
1. Shirt-dresses

One of the trending styles to pick from the spring/summer collection this year is the shirt-dress. Long shirt, which hit the stands a few years ago, has already become a classic. But, this season, designers have reimagined the shirt-dress with a variety of quirks and cuts. Drop waists, double high slits, button-downs, asymmetric hemlines, mandarin-collar: be ready to embark upon an adventure, and experiment with any look to match your personality as you play with this fashion trends for women.

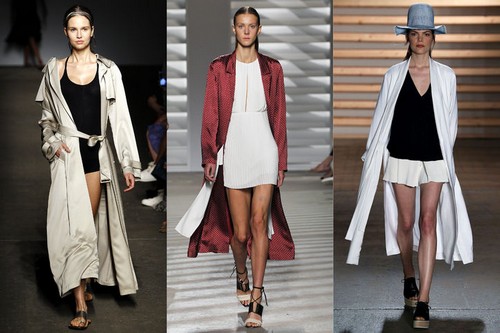
2. Kimono-style Trench Coats
This stylish mix of a modern robe, a traditional kimono and a proper coat has been a surprisingly fashionable and well-accepted trend since the last summer. A fancier, single-coloured version of last year’s waist-length flowery frocks totally worth bringing down from the runways that it is ruling this. They are slouchy, roomy and lightweight. Though thrown in with these summer trench coats, just for the sake of it, belts, especially a medium-size obi belt, with a knot in the side, can complete the look.

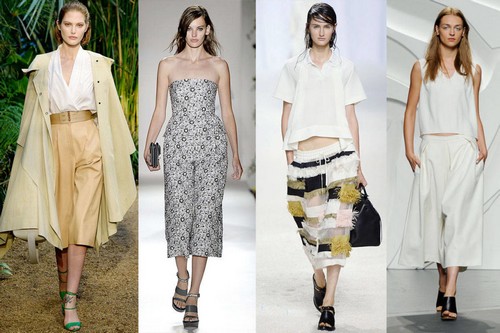
3. Culottes
Culottes are tricky, especially with the length. Falling somewhere between a bootcut and a full-on flare, have evolved from last-season’s raw denim, double-tone or embroidered variants to the almost-trousers with wide legs this pre-fall season, and the length is hemmed just between the upper ankle and lower calf. Apart from the ankle-grazing length, a higher, more notorious length is also going hot, and it will look best teamed with tall leather boots, considerably taming the style.

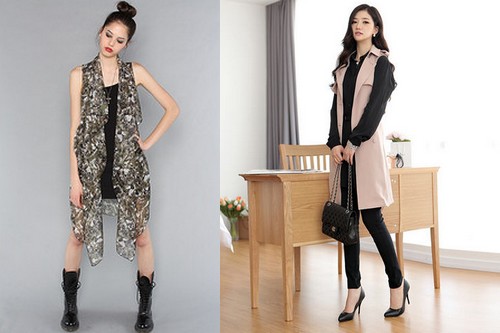
4. Long Vests
Long vests, which the designers have been playing around with for some seasons now, are perfect for the pre-fall season, particularly because pre-fall is the season for outerwear that you have been so excited about. An alternative for the 70’s jackets and blazers, long vests have a slimming effect on the body, especially when left unbuttoned. They can be worn in the late summer September on their own, showing off the bare arms, with sweater when it gets colder, or even used for a layered look.

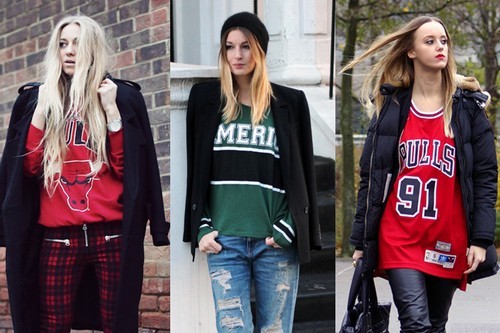
5. Sporty Look
Add the cool quotient to winter with the athletic trend, an old-school approach to styling that is making a comeback in the moderate temperatures this autumn/winter season. The classic touches like the go-faster stripes, tennis skirt, gym shorts, plimsolls or leather leggings can really jazz up the look in a fresh, splashy kind of way. The sporty design can provide a nice fit, offering great body shape. Racer backs are in, but polo neck is one of major fashion trends for women for the year.

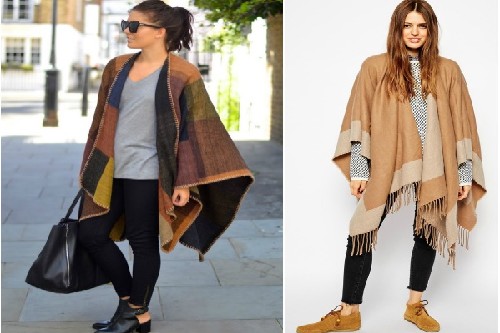
6. Cape

The trench coat is so last year! This winter, beat the harsh winter cold with the all new fashion trends for women, i.e. the cape. It closely resembles a poncho, and is flexible enough to beat all the other forms of winter dressing. It can be worn with either sides up or down, and will still go well with any other winter piece, from above-the-knee boots to the pyjama style. These are best when the neutral colours are chosen. The poncho itself offers a layered appearance. Do not miss this winter trend.

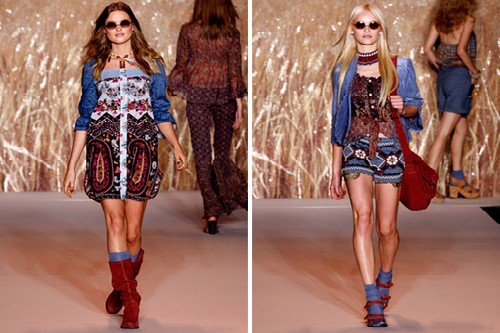
7. Gypset
Gypsy-inspired looks meets the glamorous jet set styling, and you have gypset, characterized by bold patterns, orientalism and opulence of bohemianism. It is one of the biggest fashion trend for women this year, and is totally wearable. It is a fun and enjoyable cruise line, beginning in the ‘70s. Spice up your regular work and evening wardrobe with a dash of colour and exoticism. Layered tunics with Aladdin pants, oriental-inspired accessories and bold floral patterns, will jazz up the look.

8. A-Line Shapes
A-line has been ruling the fashion world for some time now, and it is definitely on the rise, especially for the resort season. It looks best when sported with a touch of the 70s for a bit of a twist. A playful mix of masculine jackets with modernized floral prints or colourful zigzags, cropped cuts, and high-waisted flared fits or straight-leg trousers worn with trainers, can leave no doubt. A-line jumpsuits, and dresses, or skirts with embroidery, paired with shirts or knits, are feminine, and so 2016!

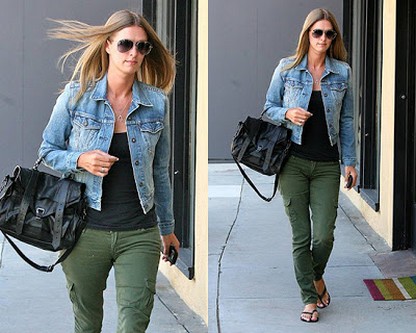
9. Trucker Jackets
If you are looking to add something to your wardrobe that you can reach in for, any time of the year, the trucker jacket is a must-have this year. The denim jackets are great when there is an onset of a slight nip in the air, and are just as great when worn under a layer, creating a fashion statement. Opt for any: just team it with slim jeans or khakis, wear it unbuttoned on a loose tee, or like a shirt. The choice is yours. This jacket is super-versatile, and an absolute essential to complete the wardrobe.

10. Saree: with a twist
The ethnic Indian wear is not just for the Indians anymore. Wear your saree with a modern twist, and drape it like a gown. Show off those curves in the styles that are rocking the ramp, or bring back the old modern style of Mumtaz. Still not enough? Throw in a blazer, a crop top, a tube, or anything that catches your fancy, in place of the boring old blouse, and add a whole new, quirky dimension to the traditional 9 yards. Add a belt. Make an absolute fusion to own the saree-clad look this year.

Original Article source : http://www.wonderslist.com/10-fashion-trends-for-women/